When developing an application, there is always a slight apprehension during deployment. This little voice that tells you "is my code going to break anything?" or even "am I sure I've run all the tests before pushing?". This fear is all the more justified when you join an existing project and don't yet have a comprehensive understanding of it.
Even worse when you are a developer on this project and a new one arrives, you're not any more reassured. Even if tests have been defined,
nothing assures us that developers run them before deployment. This is where the roles of
continuous integration (
CI) and continuous deployment (
CD) take on their full meaning.
GitLab CI/CD is a GitLab feature that allows you to set up CI/CD pipelines for any project, whether new or existing, provided it uses Git.
Motivations
Who is it for?
You can use GitLab CI/CD even without hosting your project on GitLab, by choosing the option "Run CI/CD for external repository". If you use GitHub, you will thus be able to see the status of your pipeline after pushing a commit:
Why?
Setting up CI/CD with GitLab allows you to automate the steps:
for continuous integration: Build > Tests (unit, integration, regression...)
for continuous deployment: Review > Deployment (staging, production...)
This automation accelerates code production: a single commit is enough to trigger a pipeline on the GitLab side that will handle generating a production build, running the test suite, and deploying the new version to staging/production! This also increases developer confidence and the quality of code sent to production, as we have the assurance that every modification has gone through this process.
Implementation
The stages
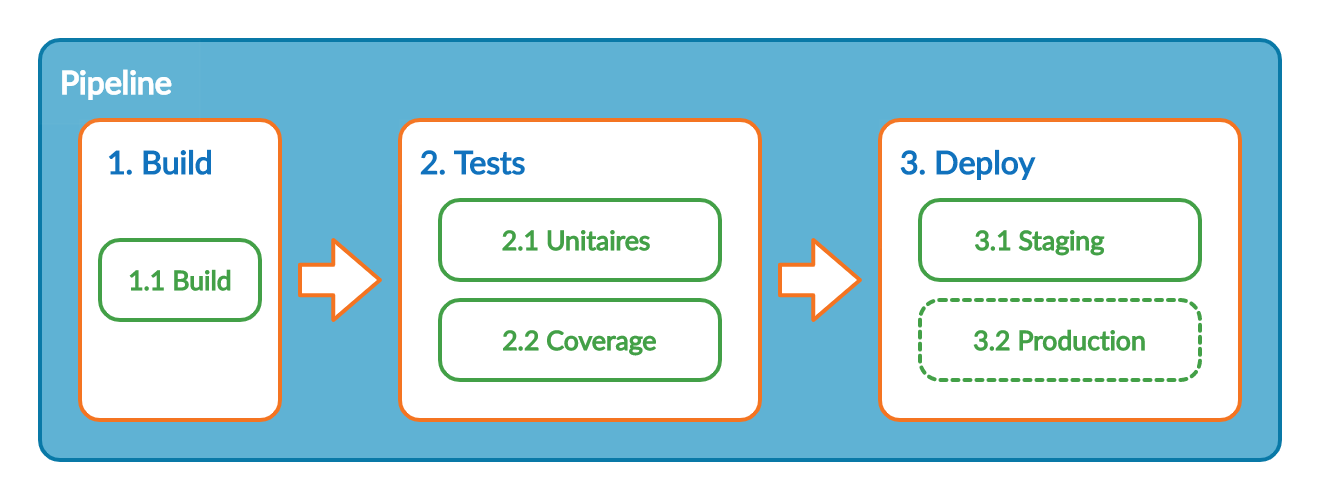
We are going to analyse the practical case of setting up a CI/CD pipeline for a web application written in JavaScript and using Next.js. Firstly, the different stages of the CI/CD pipeline that we want to create need to be defined. I propose a breakdown into three stages: Build, Tests and Deploy.
These stages are launched sequentially and are composed of jobs. A stage must contain at least one job, these being executed in parallel by default. Here is the structure of the pipeline we are going to set up; feel free to adapt it:
Here we find our three stages : Build, Tests and Deploy. In this diagram, the Tests and Deploy stages each have two jobs.
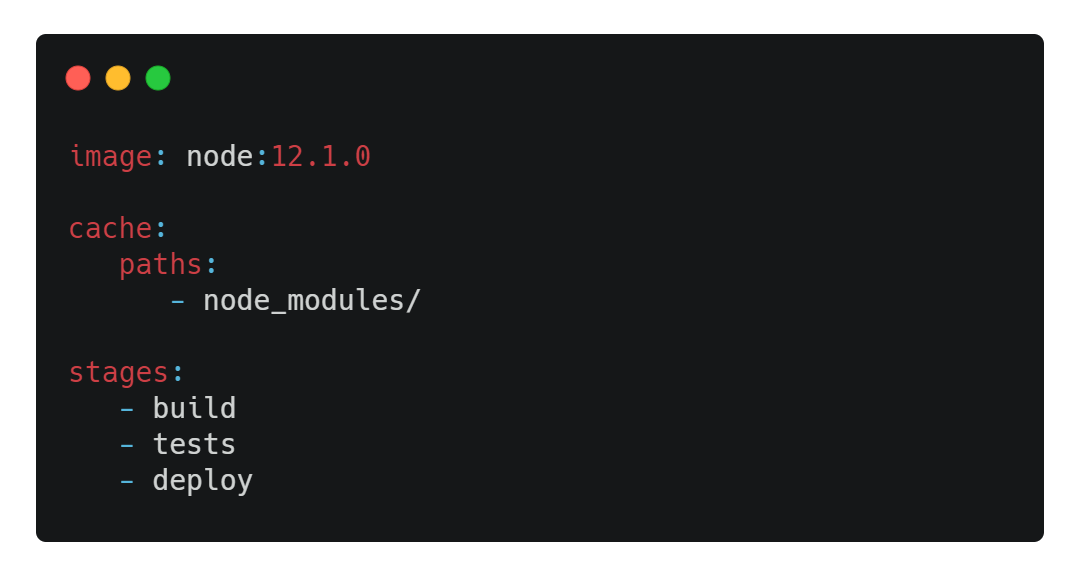
To describe the architecture of our pipeline to GitLab, we will need to create a .gitlab-ci.yml file at the root of our project and add these lines to it:
Let's look at the content of our file in more detail here:
image allows you to specify the Docker image to use to run your pipeline, to be adapted to your needs, of course,
cache allows us here to keep our node_modules in cache to avoid having to re-download them each time,
Finally,
stages allows us to define our different stages within the pipeline.
The jobs
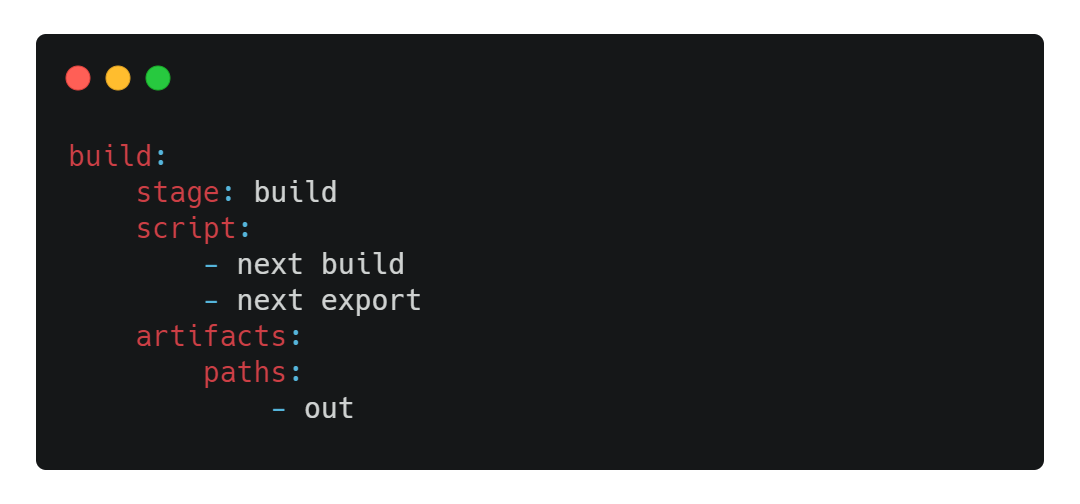
Well, the stages have been defined, but as I mentioned previously, a stage must contain at least one job, otherwise our pipeline will run nothing and serve no purpose. So let's see how to define our first job, build, by adding these lines after our .gitlab-ci.yml file:
Here, our job's name is
build, and it's located within the stage
build. The
script defines
my build procedure for my project using Next.js and generates at the end of the command
next export a folder
out containing my generated files.
The use of the keyword artifacts here allows me to define files and/or folders that will be stored within this pipeline to potentially be passed to other jobs later. In our case, we specify the folder out which contains our generated files to pass them later to the job deploy.
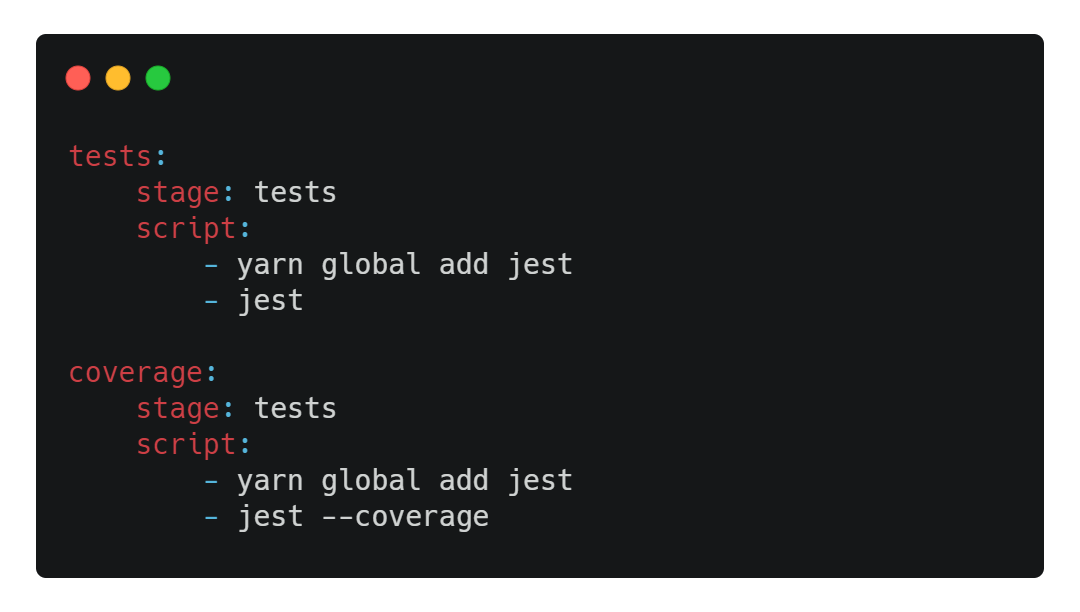
We can now add the jobs corresponding to the testsstage. Add these lines after your .gitlab-ci.yml file:
Adding multiple jobs to a stage is straightforward; we simply define the stage each job belongs to, here tests. GitLab's runners use our Docker image node:12.1.0 which doesn't contain Jest by default: so we add the required dependency before running the commands we need.
These two jobs will run in parallel with each other, as soon as the preceding step tests is complete. We can move on to the last step: deployment.
The Environment
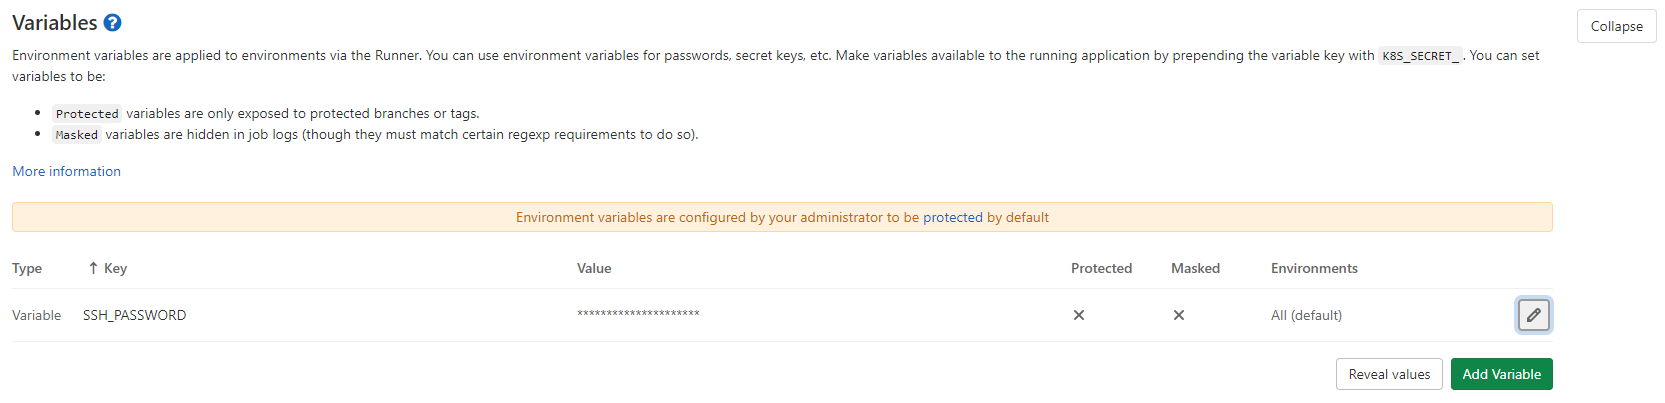
In this article, I've chosen to go for deployment using SSH; you can, of course, adapt the commands if you're using other services like AWS S3 or GCP. GitLab offers the possibility to use environment variables to avoid writing deployment service connection credentials directly in the .gitlab-ci.yml file.
To define environment variables, go to the GitLab interface and navigate to Settings > CI / CD > Variables. I've added a USER_PASSWORD variable corresponding to my SSH connection password.
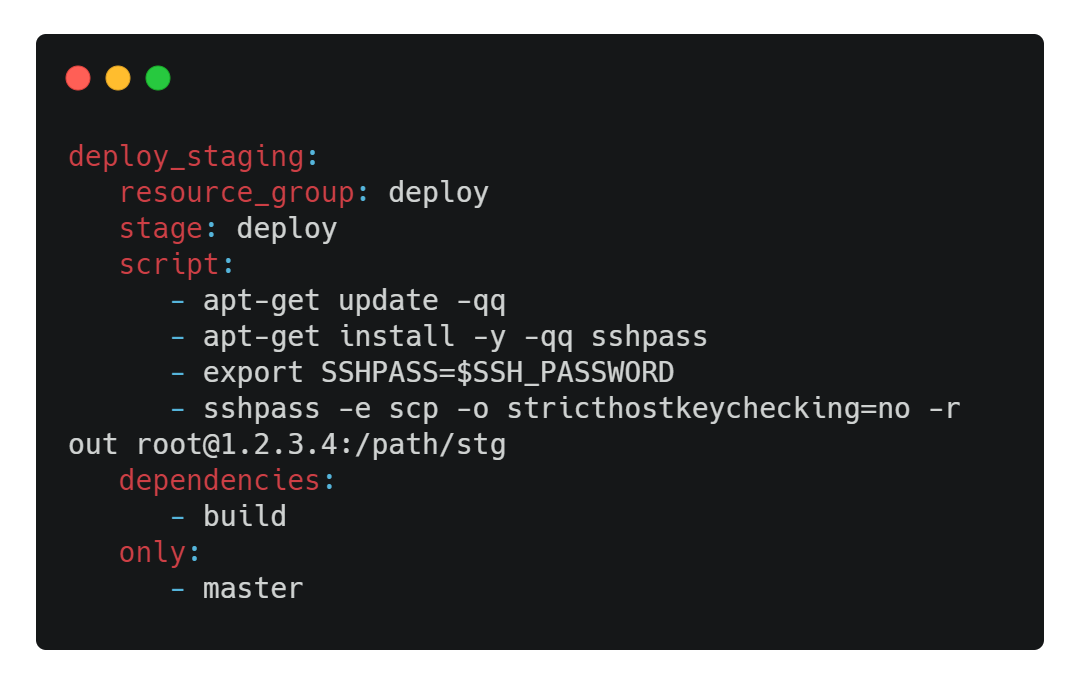
We can now write our last two jobs, allowing us to deploy the site to staging and production! I suggest we look at the staging job first:
Several points to note here. Firstly, a resource_group with a value of deploy has been defined for the job. Simply put, it's not possible for GitLab runners executing our pipelines to run two jobs belonging to the same resource_group in parallel, even if these jobs are in two different ongoing pipelines. Here, we want to prevent multiple deployments to our server to only have one connection sending files at a time.
The keyword dependencies specifies the job(s) from which we want to retrieve artifacts. We've ensured that our job build sends the folder out as artifacts; the latter will therefore be retrieved by the job deploy_staging.
Finally, the keyword only allows you to specify from which branches the job can run. Here, I've chosen to restrict deployments from the master branch.
However, we're entitled to ask a question: what's the difference between our job deploy_staging and our job deploy_production ? After all, deploy_production would be identical, with the exception of the deployment command.
Templates
GitLab has implemented a template system allowing code reuse, thus adhering to the
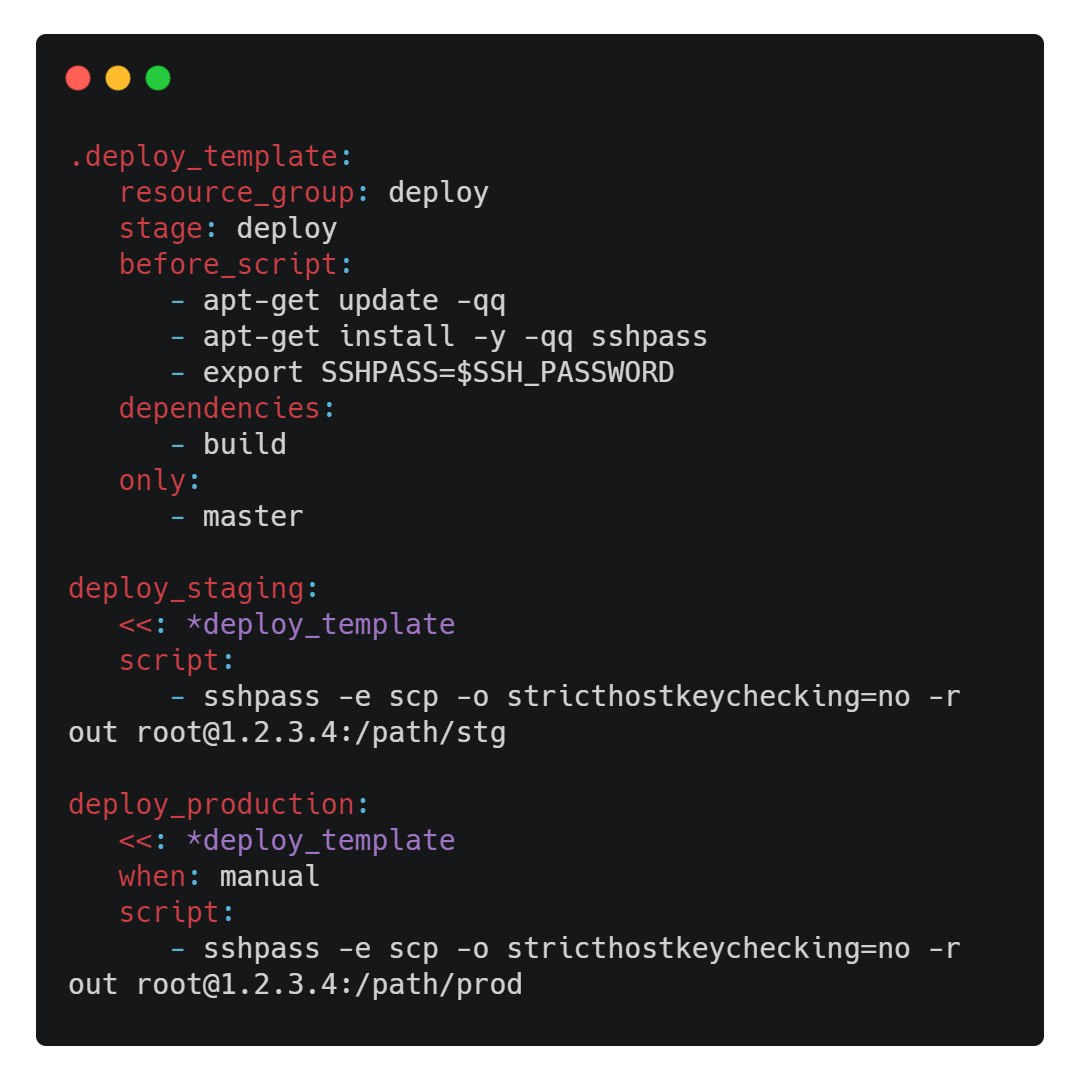
DRY development principles. In our case, almost all of the deploy_staging job's code can be reused for deploy_production. I therefore suggest modifying our .gitlab-ci.yml to define these two jobs as follows:
We thus define a template by starting its name with a dot. To reference the template, you just need to include it with the keyword <<: and reference its name with an asterisk *. A small subtlety here: we don't want the script content defined in the jobs deploy_staging and deploy_production to overwrite the template's script. GitLab allows defining three keywords in particular: before_script, script and after_script. I therefore chose to place the template commands in before_script so that they are executed before the SSH file transfer command.
I also added the instruction for production deployment when: manual. This tells GitLab that the job can only be executed via a manual trigger (and only if the previous jobs have passed!).
Results
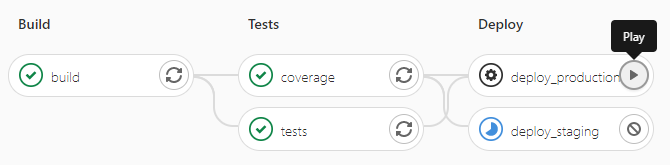
This is what our final pipeline looks like from the GitLab interface. We can clearly see our 3 stages and their associated jobs, as well as the job deploy_production which can only be deployed manually.
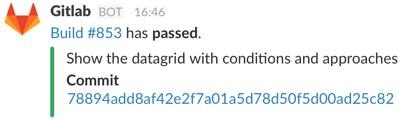
If you wish to be notified on Slack, Discord, or other applications about the status of your pipelines during a push, you can go to GitLab and navigate to Settings > Integrations and activate the corresponding notifications.
Conclusion
You now know the basics of setting up a CI/CD pipeline with GitLab! Of course, it goes without saying that the benefit of this approach is diminished if you do not write tests for your applications.
Write tests and take advantage of GitLab's services to improve your development flow and increase your productivity!
This brief introduction to GitLab is not intended to be exhaustive, and if you wish to delve deeper into things, I can only recommend that you read
GitLab CI/CD's excellent documentation and perform tests on your end!